The 1998 Jeep Cherokee XJ. A boxy, beloved, and undeniably capable off-roader. For many, it's more than just a vehicle; it's a project, a passion, and a gateway to adventure. One of the most popular modifications for the XJ is installing a lift kit, enhancing its off-road prowess, improving its stance, and allowing for larger tires. But navigating the world of 98 Cherokee lift kits can be daunting. This comprehensive guide will delve into everything you need to know, from understanding the benefits to choosing the right kit and tackling the installation.
Why Lift Your 98 Cherokee? Unveiling the Benefits
Level Up Your Legend: A Comprehensive Guide to 98 Cherokee Lift Kits
Before diving into the specifics, let's address the fundamental question: why lift your 98 Cherokee in the first place? The benefits are numerous and cater to various needs:
- Increased Ground Clearance: This is perhaps the most obvious advantage. A lift kit raises the body and chassis, allowing you to clear larger obstacles on the trail, preventing scraping and potential damage.
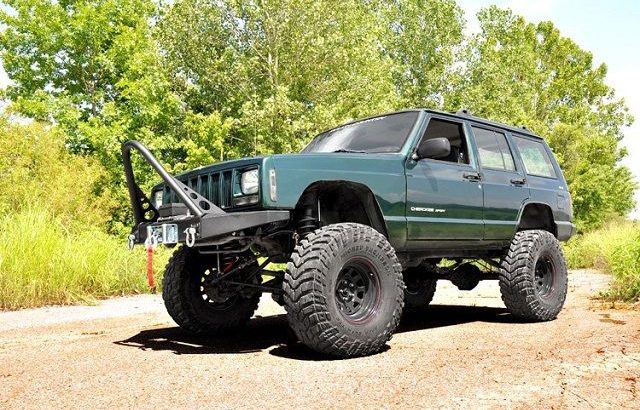
- Larger Tire Fitment: Lifting your Cherokee allows you to install larger tires, further increasing ground clearance and improving traction on various terrains. Larger tires also contribute to a more aggressive and visually appealing look.
- Improved Off-Road Capability: The combination of increased ground clearance and larger tires significantly enhances your Cherokee's off-road capabilities. You'll be able to tackle more challenging trails with confidence.
- Enhanced Appearance: Let's be honest, a lifted Cherokee looks fantastic. It gives the vehicle a more aggressive and commanding presence on and off the road.
- Improved Suspension Articulation: Some lift kits improve suspension articulation, allowing your wheels to maintain contact with the ground even on uneven terrain, maximizing traction.
Understanding Lift Kit Types: Choosing the Right Option for Your Needs
Not all lift kits are created equal. They vary in design, components, and intended use. Here's a breakdown of the most common types for the 98 Cherokee:
- Budget Boost/Coil Spacers: These are the most affordable option, typically adding 1.5-2 inches of lift. They involve installing spacers above the coil springs and sometimes longer shackles in the rear. They are easy to install but offer minimal performance improvement and can compromise ride quality.
- Pros: Inexpensive, easy to install.
- Cons: Minimal performance improvement, can negatively impact ride quality, limited tire size increase.

- Add-A-Leaf (AAL): These kits add a leaf spring to the existing leaf pack in the rear, providing lift and increasing load capacity. They are more durable than coil spacers but can result in a stiff ride.
- Pros: Affordable, increases load capacity.
- Cons: Can result in a stiff ride, may require longer shocks.

- Full Leaf Spring Packs: These kits replace the entire leaf spring pack with new, taller springs. They offer a more comfortable ride than AALs and provide better overall performance.
- Pros: Improved ride quality compared to AALs, better overall performance.
- Cons: More expensive than AALs.
- Short Arm Lift Kits: These are the most common type of lift kit for Cherokees, typically providing 3-4.5 inches of lift. They include new coil springs, leaf springs (or AALs), longer shocks, and potentially sway bar disconnects. Short arm kits offer a good balance of performance and affordability.
- Pros: Good balance of performance and affordability, improved off-road capability.
- Cons: Can cause "bump steer" and other handling issues at higher lift heights without proper modifications.
- Long Arm Lift Kits: These are the most advanced and expensive type of lift kit, providing 4.5 inches of lift or more. They involve replacing the factory control arms with longer arms, improving suspension geometry and articulation. Long arm kits offer superior off-road performance and ride quality.
- Pros: Superior off-road performance, improved ride quality.
- Cons: Most expensive option, requires significant modification.
Key Components of a 98 Cherokee Lift Kit: What to Expect
A typical 98 Cherokee lift kit includes the following components:
- Front Coil Springs: These replace the factory coil springs to provide lift in the front.
- Rear Leaf Springs (or AALs): These provide lift in the rear, either by replacing the entire leaf spring pack or adding a leaf to the existing pack.
- Shocks: Longer shocks are required to accommodate the increased suspension travel.
- Sway Bar Disconnects (Optional): These allow you to disconnect the sway bar for improved articulation on the trail.
- Track Bar (Adjustable): An adjustable track bar is often necessary to center the axle after lifting the vehicle.
- Brake Line Extensions: These provide additional length to the brake lines to prevent them from being stretched or damaged during articulation.
- Hardware: All necessary bolts, nuts, and washers for installation.
Installation Guide: A Step-by-Step Overview (Professional Installation Recommended)
Disclaimer: Installing a lift kit requires mechanical knowledge and experience. If you are not comfortable working on your vehicle, it is highly recommended to have it professionally installed.
This is a general overview. Always refer to the specific instructions provided with your lift kit.
- Preparation: Gather all necessary tools, including a jack, jack stands, wrenches, sockets, torque wrench, and penetrating oil. Park the Cherokee on a level surface and engage the parking brake.
- Front Suspension Disassembly:
- Loosen the lug nuts on the front wheels.
- Raise the front of the Cherokee and secure it with jack stands.
- Remove the wheels.
- Disconnect the sway bar links (if equipped).
- Disconnect the shocks.
- Disconnect the brake lines from the calipers (be prepared to catch brake fluid).
- Remove the calipers and rotors.
- Support the axle with a jack.
- Disconnect the track bar from the axle.
- Remove the coil springs.
- Front Suspension Installation:
- Install the new coil springs.
- Install the new shocks.
- Reconnect the track bar (using an adjustable track bar if necessary).
- Reconnect the brake lines (using brake line extensions if necessary).
- Reinstall the calipers and rotors.
- Reconnect the sway bar links (if equipped).
- Reinstall the wheels.
- Lower the Cherokee to the ground.
- Rear Suspension Disassembly:
- Loosen the lug nuts on the rear wheels.
- Raise the rear of the Cherokee and secure it with jack stands.
- Remove the wheels.
- Disconnect the shocks.
- Disconnect the brake lines from the axle (be prepared to catch brake fluid).
- Disconnect the parking brake cables.
- Support the axle with a jack.
- Disconnect the leaf springs from the axle.
- Rear Suspension Installation:
- Install the new leaf springs (or AALs).
- Install the new shocks.
- Reconnect the brake lines (using brake line extensions if necessary).
- Reconnect the parking brake cables.
- Reinstall the wheels.
- Lower the Cherokee to the ground.
- Final Steps:
- Torque all bolts to the specified values.
- Bleed the brakes.
- Get a professional wheel alignment.
Important Considerations Before You Lift:
- Budget: Lift kits range in price from a few hundred dollars to several thousand. Determine your budget before you start shopping.
- Intended Use: How will you be using your Cherokee? If you primarily drive on the road, a mild lift is sufficient. If you plan on doing serious off-roading, you'll need a more capable kit.
- Tire Size: Decide what size tires you want to run. This will help you determine the appropriate lift height.
- Driveline Angles: Lifting your Cherokee can affect driveline angles, potentially leading to vibrations and premature wear. Consider installing a transfer case drop kit or SYE (Slip Yoke Eliminator) kit to correct these angles, especially with lifts over 3 inches.
- Steering Geometry: Lifting your Cherokee can also affect steering geometry, leading to "bump steer" and other handling issues. Consider installing a drop pitman arm or steering box spacer to correct these issues, especially with lifts over 3 inches.
- Legality: Check your local laws regarding vehicle lift height. Some areas have restrictions.
Tips for a Successful Lift Kit Installation:
- Read the instructions carefully: This is the most important tip.
- Use penetrating oil: Apply penetrating oil to all bolts and nuts several days before starting the installation.
- Have a helper: Lifting a vehicle is much easier with a helper.
- Take your time: Don't rush the installation.
- Double-check everything: Before driving the vehicle, double-check all bolts and nuts to make sure they are properly torqued.
- Get a professional wheel alignment: This is essential after installing a lift kit.
Potential Challenges and Solutions:
- Rusty Bolts: Old Cherokees often have rusty bolts that can be difficult to remove. Use plenty of penetrating oil and consider using a torch to heat the bolts.
- Stuck Bushings: Bushings can become seized in the control arms and leaf springs. Use a bushing press or a hammer and punch to remove them.
- Driveline Vibrations: Lifting your Cherokee can cause driveline vibrations. Install a transfer case drop kit or SYE kit to correct these angles.
- Bump Steer: Lifting your Cherokee can cause bump steer. Install a drop pitman arm or steering box spacer to correct this issue.
Price Table of 98 Cherokee Lift Kit
| Lift Kit Type | Lift Height (inches) | Estimated Price Range | Key Features | Common Brands |
|---|---|---|---|---|
| Budget Boost (Spacers) | 1.5 - 2 | $100 - $300 | Simple installation, cost-effective | Rough Country, Daystar, Teraflex |
| Add-A-Leaf (AAL) | 1.5 - 2.5 | $200 - $400 | Increased load capacity, moderate lift | Rubicon Express, Pro Comp, Skyjacker |
| Full Leaf Spring Packs | 2 - 4 | $400 - $800 | Improved ride quality, better performance | Old Man Emu, Deaver Spring, Rancho |
| Short Arm Lift Kit | 3 - 4.5 | $600 - $1500 | Good balance of performance and affordability | Rough Country, Rubicon Express, Zone Offroad |
| Long Arm Lift Kit | 4.5 + | $1500 - $4000+ | Superior off-road performance, improved ride quality | Clayton Off Road, Rock Krawler, MetalCloak |
Note: Prices are estimates and can vary depending on the brand, specific components included in the kit, and retailer. Professional installation costs are not included in these prices.
Frequently Asked Questions (FAQ)
- Q: How much does it cost to lift a 98 Cherokee?
- A: The cost varies depending on the type of lift kit you choose and whether you install it yourself or hire a professional. Expect to pay anywhere from $100 for a budget boost to $4000+ for a long arm lift kit with professional installation.
- Q: What size tires can I run with a 3-inch lift?
- A: Typically, you can run 31-inch tires with a 3-inch lift on a 98 Cherokee.
- Q: Do I need to re-gear after lifting my Cherokee?
- A: It depends on the tire size you choose. If you go with significantly larger tires (e.g., 33 inches or larger), re-gearing is recommended to maintain optimal performance.
- Q: Will lifting my Cherokee affect its fuel economy?
- A: Yes, lifting your Cherokee and installing larger tires will likely decrease your fuel economy.
- Q: Is it difficult to install a lift kit myself?
- A: It depends on your mechanical skills and experience. Some lift kits are easier to install than others. If you are not comfortable working on your vehicle, it is best to have it professionally installed.
Conclusion: Elevating Your Cherokee Experience
Lifting your 98 Cherokee is a fantastic way to enhance its capabilities and appearance. By understanding the different types of lift kits, the components involved, and the important considerations, you can make an informed decision and choose the right option for your needs. Remember to prioritize safety, follow instructions carefully, and don't hesitate to seek professional help when needed. With the right lift kit and proper installation, you can transform your 98 Cherokee into a capable and eye-catching off-road machine. So, get out there, explore the trails, and enjoy the enhanced experience of your lifted XJ!